A fantastic review of Crystal Clay by guest blogger Gillian Salisbury.
I was very excited when I was given the opportunity to try out Crystal Clay. A relatively new crafting/jewellery making product which Cooksongold have recently started to supply. It appears to be quite big in the States and I can see it repeating that status here in Britain too. The product is quick, easy to use and it was really fun to work with it.
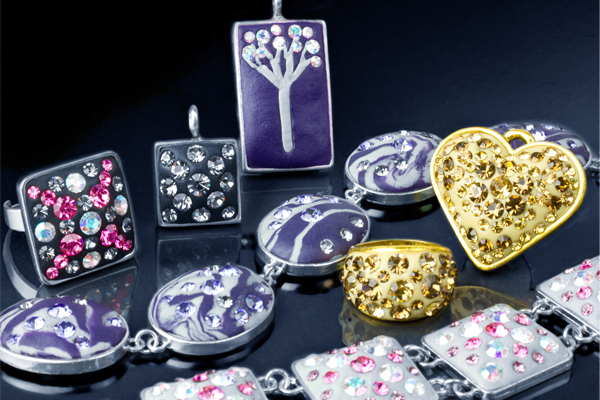
I was delighted to receive a little parcel in the post and on opening it found 3 pendants of various shapes and sizes, 3 different types of rings, 2 bracelets and 4 different coloured clays with a huge assortment of round crystals or “chatons” to play with.
Rather than buying this in kit form, where the colours and styles are created for you, all parts are sold separately giving you the opportunity to combine the colour of your crystals with any colour clay and to set them into any blank you can get your hands on. The design opportunities are endless.
Crystal Clay is AMAZINGLY easy to work with. It’s a 2 part clay, like epoxy resin. The two parts are 1 part richly coloured clay and 1 part epoxy, equal parts of which have to be combined and kneaded together before being pressed into your favourite setting before placing the crystals into the clay in a pattern of your choice.
I thought when I first started mixing the two parts together that the colour of the clay would be diluted by the epoxy but it isn’t in the slightest. The purple stays deep purple and the black remains deepest black. It’s incredible!
Getting started at my first attempt with the crystal clay I was careful to read the instructions properly and followed them throughout, but as I said earlier, this product is so easy to work with that there wasn’t a whole lot to follow. There are really only two very important factors to take into consideration; one is to wear the gloves provided with the clay as the epoxy resin can cause irritation to some people. I value my hands too much to ignore this instruction and wore the gloves throughout the whole process. And the second is to mix the parts in equal quantities otherwise the finished clay will not set properly.
Top Tip:
At this point I’ll share a little tip regarding the gloves. The ones provided in the kit are for average ladies hands but being a tall lady myself my hands are on the large size. This made the gloves a little snug but this actually worked to my advantage as it made the clay easier to work with. There were no creases for the clay to slip under and no creases to leave impressions in the clay surface when working. I’d advise buying your own disposable vinyl gloves from the supermarket in a size smaller than your usual if you have any problems with the pair supplied with the clay.
Anyhow….The two parts of the clay are VERY sticky to work with and equally sticky when combined together. I tried kneading them on the top of my clean worktop but after seeing how well it stuck to the surface I soon decided to scrape it up from there quickly and then kept it in my gloved hands, kneading it continuously with the thumb of one hand into the palm of the other. (It will stick to the gloves a little but not as frighteningly as it sticks to the worktop!) I did this for a couple of minutes until both parts were thoroughly mixed together and then rolled it into a ball ready to place into the chosen setting.
First Attempt
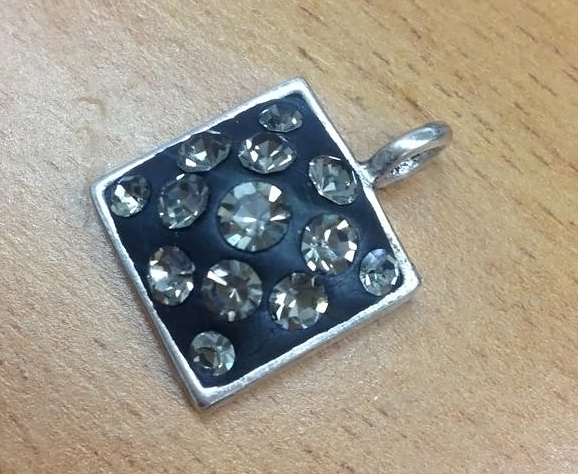
I chose a simple flat square silver tone pendant and pressed my ball of jet black clay into it. I guess the hardest part of using this product is in gauging just how much of the two parts of clay are needed to completely fill the blank without having too much. More could be mixed to combine with the original if you didn’t have enough and surplus could be pinched out of the setting before smoothing the surface of the clay again but I can’t help feeling it’s better to gauge it right in the first place. It saves time AND money.
Once the clay was placed in the setting it was a simple matter of smoothing the clay down and into the corners and edges of the piece. You can use fingers for this or modelling tools. Having previously jumped into the silver clay experience I was lucky enough to have some good modelling tools to hand, but really, anything can be used. Cocktail sticks, lolly sticks, ballpoint pens, etc etc. You get the picture.
Once I was satisfied that the surface of the clay was smooth and that all the corners of the setting had been filled I could set about the deliciously satisfying art of setting the crystals. The clay comes supplied with a little blob of beeswax attached to the tip of a toothpick and this is used to gently pick up a crystal and place it onto the clay. The beeswax holds the crystal so well that sometimes they don’t want to be separated but by rolling the toothpick across the top of the crystal the clay will hold the stone in place. Then it’s a simple matter of using the un-waxed end of the toothpick to press the crystal down into the clay.
It’s best to push the stone down so that its broadest part is flush with the clay. I found out the hard way that if the stone sits above the surface of the clay it will catch on your clothing later and come out with a ping! However don’t press it in below the surface of the clay or the stone’s light-catching abilities will be reduced and that would be a great shame as these little beauties can REALLY sparkle.
The real art of this particular product is in the placing of the stones into the clay. I’ve seen pieces where anything goes regarding pattern and these can be very eye-catching but I’m not very confidant in my abilities to pull that off so placed the stones in a regular and symmetrical pattern. I became more adventurous with my second attempt and chose a heart shaped pendant which I filled to overflowing with gold clay for a nice big fat chunky pendant and placed the stones to make a flower with a decorative trim at the three corners of the heart.

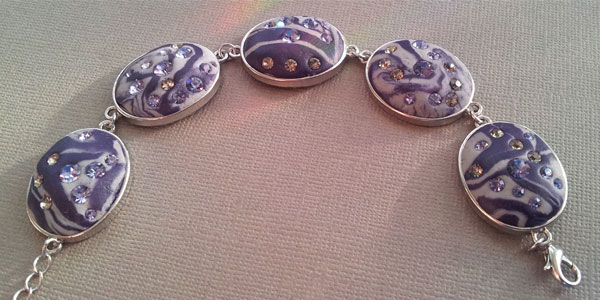
I had heard that it was possible to make a marbled effect by combining two different colour clays so, being an adventurous “try anything once” kinda girl, I had to give that a go. Once I’d reached a comfortable level of skill with the clay I set about making purple and silver marble.
I rolled out some premixed purple clay and made a long thin sausage with it before doing the same with some premixed silver clay and then coiled them both loosely together and gently squished them. I had to be careful at this point as overworking the colours will blend them into one colour. The end result was the gentle mottling and irregular striping of natural marble. When it came to decorating this clay with the crystals I was torn between smothering it in crystals and risk hiding the marble effect or holding off on the stones and let the marbled clay be the main feature. I went for the latter option and then simply highlighted the patterning with crystals. This became a bracelet of 5 marbled cabochons with the odd flash of tanzanite and black diamonds.
I’m very sad to say that at this point of my Crystal Clay experience I ran out of blanks to fill but still had lots of clay and stones left over. It’s been a week or more since I was last able to set crystals into clay and I now find myself looking around the house for things to cover in clay and sparkle up. It doesn’t just have to be jewellery items. Fridge magnets? Mobile phone covers? I need to do more. Now…..where’s the cat?….he’s been looking rather dull of late…..

Cooksongold