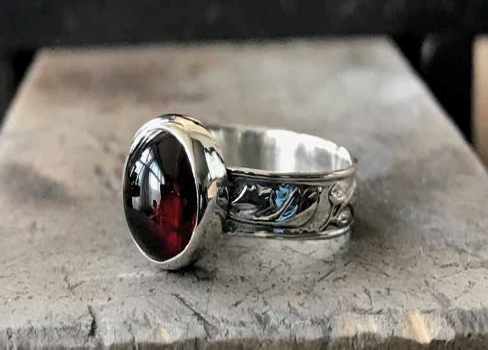
Create this stunning silver bezel cabochon ring! Simply follow our step by step guide from jewellery designer, Sharon Philogene.
Step 1:
Measure and Cut.
To start off, cut the required amount of patterned wire for the ring size you want to make by wrapping the wire around the ring mandrel, marking it by the size then cut it. Alternatively, you can look up the circumference on a ring size chart, and add to this 3 x the width of the wire to allow for it to fit.

Step 2:
File and Shape.
Next, file the ends of the wire flat (you can use a mitre cutting vice if you have one) so they fit together with no gaps for soldering. Shape the wire into a circle, bringing the ends together so the ends meet.
Step 3:
Solder The Ring.
Place some flux and then a small piece of hard solder on the seam line and on a soldering board, gently heat the ring, starting from the back and the all around, concentrating on the join until the solder flows. Put the ring into the pickle.

Step 4:
Measure The Bezel.
Take your bezel strip and wrap it around your cabochon, mark it where it meets the other end and cut it.

Step 5:
Solder The Bezel.
As before, file the ends flat so they meet with no gaps, place some flux and a small piece of hard solder on the seam line. Gently heat the bezel starting from the back, and then all around concentrating on the join until the solder flows, then pickle.

Step 6:
Forming The Ring.
Put your ring onto your ring mandrel, forming it gently with a rawhide mallet or nylon hammer. If the ring is too large, you can always cut, file and solder the piece again.

Step 7:
Files The Edges.
File a flat edge across the solder line, using a mitre cutting vice if you have one. The flat edge just needs to be flat enough for the bezel cup to sit on.

Step 8:
File The Bezel.
Take your bezel and gently push it over the cabochon to shape it, or pop it on a round triblet and form it gently as before. File the bottom of the bezel so it is nice and flat, ready to solder onto the sterling silver sheet.

Step 9:
Solder and Cut.
Place the bezel onto the sterling silver sheet, then put flux around the inside of the bezel and onto the sheet. Place a few pieces of medium solder against the sheet and the bezel, and gently solder as before. The solder will move from the heat, so using a solder pick move it back against the bezel. Pickle, then saw around the bottom of the bezel so you are left with a bezel cup.

Step 10:
Soldering The Ring.
Place the bezel bottom up onto the soldering board, add some flux to centre of the bezel then put the ring onto the flux (you may need to use a third hand to keep the ring in place). Place some easy solder on both sides of the ring, and solder as before. If the solder moves push it back with the
soldering pick, then when finished pickle the ring.

Step 11:
Polishing The Ring.
The ring is now ready to be polished! The easiest way is to barrel polish for about half an hour to an hour, but if you do not have a tumbler you can clean the ring up using a micro motor and pendant wheels.
Step 12:
Setting The Cabochon.
To set the stone using the Technique Master Bezel Set (which I have used), place the ring into a ring clamp, and put the stone into the bezel cup. Choose a punch that is slightly bigger than your bezel, and start hammering in a circular motion (without the handle) until the bezel is closer to the stone. You may need to change your punch to a slightly smaller one at this point, to bring the bezel in further again and secure the stone. When you are happy with the setting of the stone, burnish the outside of the ring by putting the punch in the handle and push against the ring in a circular motion again. Then burnish the inside of the bezel with a burnisher, to give it a nice finish and to secure the stone further.


Step 13:
Alternative Setting.
If you do not have the Technique Master Bezel Set, you can use an alternative method. First, lightly sand the top of the bezel to make sure it is even, then place the ring into a ring clamp and put the stone into the bezel.
Make sure the bezel is not too high for the stone – if it is, take the stone out and file the bezel until it is the right height for the stone.
Once you are happy with the fit of the stone, start to set the stone by gently pushing the bezel with a bezel pusher around the stone, working on opposite sides until all the edges are pushed against the stone.
Make sure the stone is secure and doesn’t move, if it does go around the bezel pushing it against the stone again. When the stone is secure, you can then burnish the edge of the stone by pushing it around the bezel, making the stone more secure and with a beautiful finish.
Step 14:
Finishing Touches.
To finish off, clean up any marks on the bezel from setting it by sanding them away, carefully and give the ring a final polish. Finish.


Sharon Philogene