Want to learn how to make a ring using silver clay? In this project you’ll learn how to create a stunning silver clay ring, from start to finish. Whether you’re a seasoned jewellery maker or a beginner, this step-by-step guide will take you through the process of working with silver clay. From shaping your clay to firing and polishing your finished piece, read on to learn how to make your own silver clay ring.
What you Need
Step By Step Guide
Step 1
The first step when making your clay is to put some non-stick paper around your mandrel, if you are able to, then at this point you should draw a line around your baking paper. This might seem odd but this line will work as a guide when putting your silver clay on the mandrel, allowing you to keep it perfectly straight.
Note: It is recommended that you make your ring two sizes bigger than your ring size to allow for shrinkage.

Step 2
Roll out and flatten your silver clay using the acrylic rollers available in the metal clay starter kit ensuring it is an even thickness across all of the metal clay.
Note: It is better to roll out more silver clay than you think you might need as having more is better than not having enough.

Step 3
Using a metal clay cutting blade, carefully cut a strip out of your rolled out silver clay for your ring. This is what is going to be used as your ring band.

Step 4
Carefully place your strip of silver clay onto the mandrel and line it up using the line you have drawn around the baking paper. Once your strip is in place, gently wrap the silver clay around the mandrel ensuring that both sides join together.
If your join overlaps, use the metal clay cutting blade to carefully cut the excess silver clay off, ensuring that both ends of your silver clay is perfectly joined together.

Step 5
Using silicone clay shapers, add some metal clay paste (slip) to either end of your join to ensure that it is able to join together properly when firing and has a smooth finish and place it to one side.
Note: You can use a paint brush to apply this, but silicone brushes avoid leaving any brush marks in your silver clay.

Step 6
Roll the spare bits of silver clay into a ball. This is going to be used for the setting for your ring. Ensure that the ball is as smooth as possible so there is no cracks when it is fired.

Step 7
Once you are happy with your silver clay ball, use some more slip to attach the ball to your ring band where the join is.
Note: Be careful when attaching the ball to the silver clay band as you don’t want to squish what you have made.

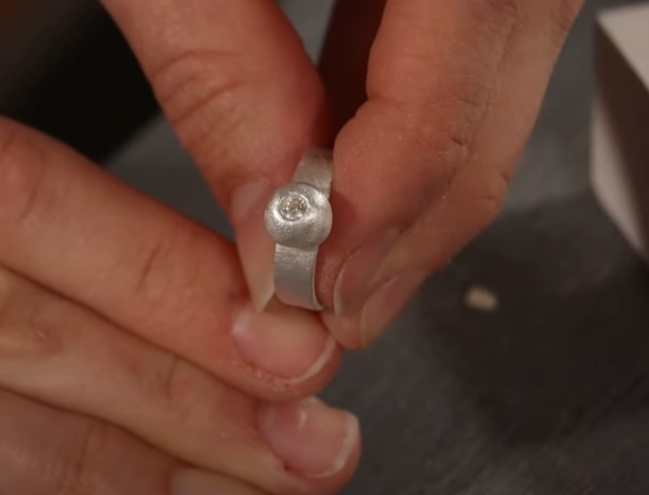
Step 8
Place your cubic zirconia in the middle of the silver clay ball and push down on it ensuring that your cubic zirconia is all the way into your ball.
Note: Ensure that your cubic zirconia is pushed into your silver clay ball quite far so that when it shrinks it isn’t pushed out.

Step 9
Once you are happy with how your ring looks, you need to leave it in a safe place to dry. If you notice there are any cracks or bits that you are not happy with, now is the time to address those using more slip and let it dry for 24 hours.
Step 10
When your ring has been drying for 24 hours, remove it from the mandrel and check to see if there are any inconsistencies. Using a file or abrasive pads, ensure all areas of your ring are smooth and ready to be fired.
Note: Be gentle when filing and smoothing your silver clay ring as at this stage the clay is very brittle, putting too much pressure on it could cause it to break.

Step 11
Fire your silver clay ring using a hand blow torch for three minutes. First you need to burn off the organic binder. Once you have done that you will need to get your ring up to temperature. You are looking to get it at the glowing orange colour consistently for three minutes to ensure your silver clay has fused together.
After you have done this, leave it to cool, don’t quench in any water as it could cause the stone to break.
Note: You may need to remove the flame from your ring and put it back on as if it gets too hot your piece could melt.

Step 12
Once dry, use the wire brush to remove the top layer of silver clay off your ring revealing a brushed silver finish to your ring.

It really is that simple but of course, as with all types of jewellery making if your new to working with silver clay then it is a good idea to first practice both moulding and firing your clay.
We stock an extensive range of silver clay and silver clay tools and accessories from leading brands including Project X Clay and Art Clay Silver so you’ll find everything you need to get started.
Once you have developed your skills, with this project and many of our others, you’ll be able to easily create jewellery from silver clay.
To watch our step-by-step video on how to make this ring click here

Sian Brown
Sian has been hand making her award winning jewellery in the West Midlands for over 12 years. Sian spent 10 years in Birmingham’s historic Jewellery Quarter before relocating to a quiet Worcestershire village.