We have a wide range of readymade settings, from silver ring settings and mounts to gold pendant settings. They come in various sizes and shapes so you can be sure to find the perfect setting to let your jewellery sparkle. As well as help you to create the 4-Claw Pendant in this project
In addition to the above listed materials in the kit list, you will also need:
- Polishing Materials
Step 1: Thin the Prongs
Hold the pendant setting securely on the peg. Re-establish the seat in the setting and file back the inside of the prongs by about 0.5–1mm using a stone setting burr. Thinning the prongs this way allows a firmer and easier set of the stone. Take care not to thin the metal too much. You can also adjust the height of the prongs at this stage

Step 2: File the Prongs
Using a flat needle file, file the top of the prongs to an angle of about 45 degrees. Polish the inside of the setting before inserting the stone.

Step 3: Set the Stone
Insert the stone and push the tips of the prongs over the stone. A prong pusher is used for this setting, but any flat-ended pusher is also appropriate. Be careful not to slip the pusher out of position when setting. To ensure a firmer hold on the pendant, use a ring clamp. Do not deform the shape of the pendant.

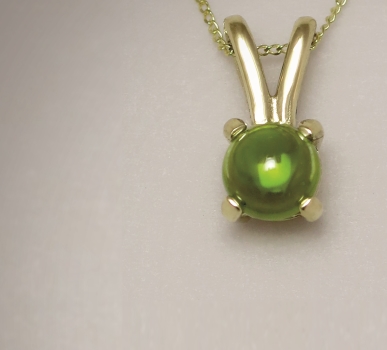
Step 4: The Finishing Touch
Burnish the prongs so that their edges are flush with the stone. Give the ring a final polish. Attach the chain and your pendant is now complete!

Now it’s time to admire your creation

See our collection of settings to allow you to create this project and more

Zoe Davidson Jewellery
Zoe Davidson draws much of the inspiration for her unique jewellery from Orkney’s seas, coastlines and rich history. She designs and makes all her pieces, mixing traditional silversmithing techniques with more unusual processes, including fold-forming and anti-clastic raising.