
Design guidelines
Take a look at our design guidelines to learn more about how to design the best possible piece.
Design Library
If you’re interested in exploring precious metal casting but never designed in CAD before? No worries! We’ve created a selection of beautiful designs, which you can order directly from our design library.
View Library
Automated Checks
When you upload your file, these checks will happen automatically:

Design Size
Designs must fit within the maximum size of 30mm x 50mm x 70mm. Our systems won’t process files larger than this.

Model Integrity
Your model must be watertight or closed with the right normals and manifold.

File Size
Our maximum file size is 50mb anything larger than this won’t be accepted.
Pre upload checklist
Before you upload take a look at our checklist below to help us
print your piece correctly every time.
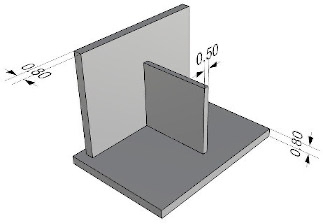
We would advise structural and external walls to have a minimum metal thickness of 0.8mm with smaller elements such as claws or small setting bezels to have a minimum metal thickness of 0.5mm.
Earring posts will not be printed as the length and thickness does not print well. We would advise that these are soldered on to the piece after it has been printed.
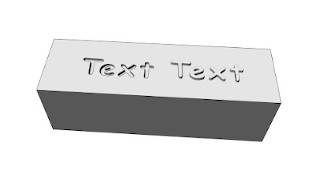
You can create details such as embossed or recessed images and lettering on pieces but sometimes a post Precious Metal Casting process will give better results especially with text.
Raised text must be 0.30mm thickness at a minimum and no more than 0.60mm high with a spacing of 0.30mm between letters.
Recessed text must be 0.30mm thickness at a minimum and no more than 0.50mm deep with a spacing of 0.30mm between letters. We would also recommend using a negative draft angle (taper). It is better to keep the width of the recessed areas larger than the depth.
For better results ensure there are no sharp edges and that any text is filleted/rounded.
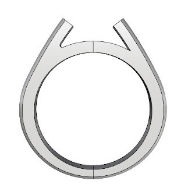
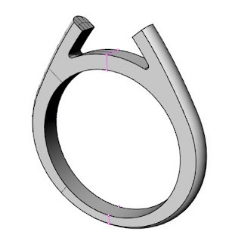
Two edges that meet into a sharp point or edge will not print very well. This process prefers softer and rounded edges to get the best results.
If you do have a sharp external edge, we would recommend either thickening the edge to 0.30mm or using the fillet tool to create a soft 0.30mm radius. The same applies to a sharp internal edge.
It is better to have too much material in these places and you can sharpen the edges during finishing.
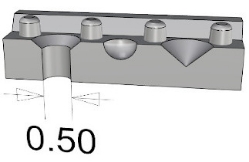
Small holes should be avoided as they will cause issues during the process. Holes should be no smaller than 0.50mm at a minimum.
Fill the holes during the CAD process and if you do need to create pilot holes for setting then use a conical/spherical shape to create a guide for a drill to be used once cast. It is better to keep the width of the pilot divot larger than the depth.
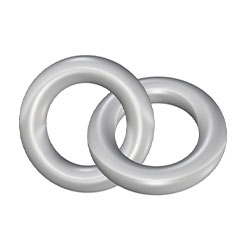
Unfortunately, we cannot process hollow pieces. To get around this you may be able to cast two halves and solder/weld the two pieces together.
The same applies to interlocking/multiple pieces. If they are not one part then they will need to be cast separately and assembled once complete.
Before uploading your design, it is best to ensure that the design is watertight.
It is important to check your design for naked edges and non-manifold edges and fix these issues. Most of the time non-manifold errors will stem from shared edges/points. You may be able to overlap areas or thicken points to help avoid this. Naked edges will show where there is a gap in model.
If there are multiple elements to the design that needed to be printed at the same time and together these parts must be booleaned. You will need to check that they are not just grouped but unioned together as one piece.
You should export the model to a high resolution stl for the best print quality. We would recommend viewing the stl once exported to ensure you are happy with it.
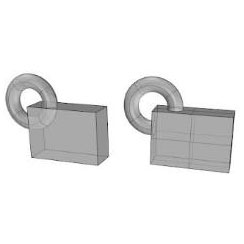
Sprues are used when casting a 3D printed piece. They feed metal into the piece in order for it to become a solid metal part. There will be remanets of the sprue or sprues left on some 3D printed pieces. We will decide the best placement for the sprue based on the design. Occasionally more than one sprue is needed depending on the size or if there needs to be a sprue to keep tension in a piece.
Please do not add any casting sprues to your design. This is because the order value is based on the stl volume. If the stl contains sprues you will be paying more for no reason. If you want sprues placed at certain points, please email us.
Shrinkage occurs during the print process; we apply a scaling increase to cover this shrinkage.

Precious Metal Casting parts will come in a semi-finished manner, they will have the majority of the sprue cut off and then will be sent out to yourself once a thorough quality inspection has been completed.
This will allow you to finish the products to your desired quality. We would advise adding extra material to areas where there is going to be a high shine finish as the buffing and polishing process will remove material. Typically finishing can remove approximately 0.1mm but this depends on the processes used. ocess; we apply a scaling increase to cover this shrinkage.
Polishing options are available learn more.

for exclusive offers & advice
By subscribing you agree to our Terms and Conditions and Privacy & Cookies Policy.


We ship to over 70 countries! With fast, cost effective delivery methods. More Info.


© 2025 Cookson Precious Metals Ltd. VAT Registration No. GB161 8062 21. Registered in England no. 2775187. Registered Office: 59-83 Vittoria Street, Birmingham, B1 3NZ
Tel: 0345 100 1122 or 0121 200 2120 Fax: 0121 212 6456